
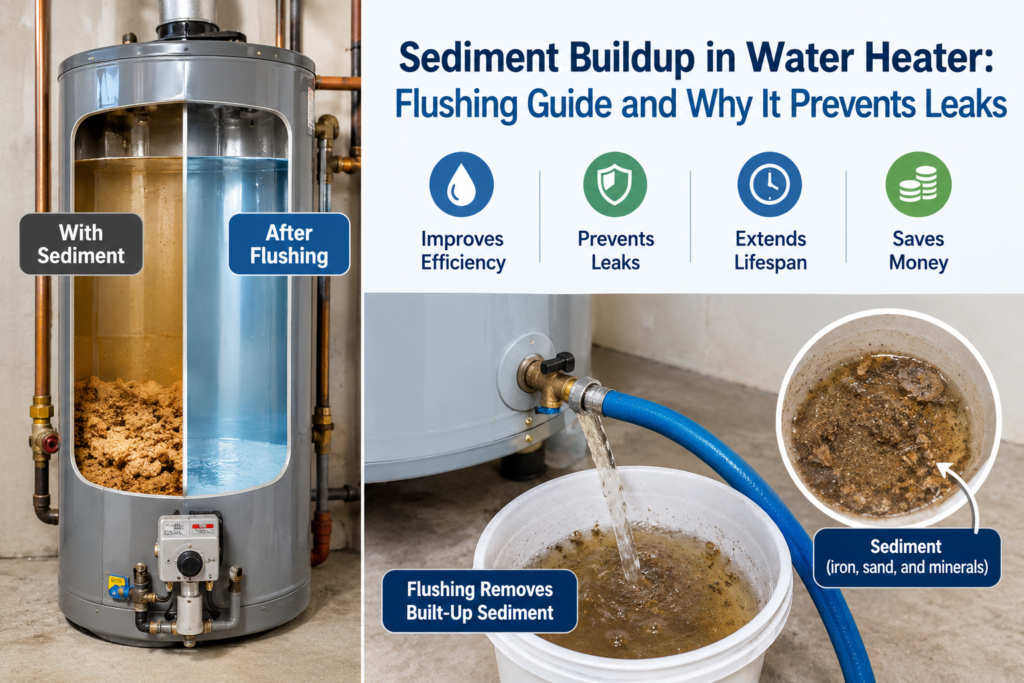
Your water heater works silently every day heating showers, running dishwashers, filling laundry machines and most homeowners never think about it until something goes wrong. But there’s a slow, invisible problem building at the bottom of your tank right now: sediment.
Over months and years, dissolved minerals in your water supply settle out as heat is applied, forming a thick, rocky layer on the floor of your water heater tank. This layer doesn’t just reduce efficiency. Left unchecked, it overheats your tank walls, accelerates corrosion, and eventually causes leaks that can flood a utility closet, a basement, or an entire floor of your home.
The good news? Flushing your water heater once or twice a year is one of the simplest, lowest-cost maintenance tasks you can perform. This guide explains exactly what sediment is, what it does to your tank, and how to flush it out in under an hour before it turns into a repair bill that runs into the thousands.
What Is Sediment Buildup and Where Does It Come From?
Tap water even clean, treated municipal water contains dissolved minerals. Calcium carbonate, magnesium, lime, and silica are the most common. In cold water, these minerals stay dissolved and invisible. But the moment water is heated, they precipitate out of solution and fall to the bottom of the tank as fine particles.
Over time, those particles compact into a hard, sandy, or chalky layer. In areas with hard water which affects an estimated 85% of homes in the United States, according to U.S. Geological Survey data this process happens faster and produces more buildup per gallon heated.
According to the U.S. Department of Energy, water heating accounts for approximately 18% of a home’s total energy use. A water heater struggling against a thick sediment layer can use significantly more energy just to deliver the same amount of hot water raising your utility bills while quietly damaging the equipment.
5 Warning Signs Your Water Heater Has Sediment Buildup
Before you reach for a hose, check whether your tank is already showing sediment symptoms:
1. Rumbling, Popping, or Banging Sounds
The most recognizable sign. As water trapped beneath the sediment layer superheats and bursts through, it creates loud cracking or knocking sounds. Many homeowners mistake this for a failing tank but it’s often just sediment.
2. Longer Wait Times for Hot Water
Sediment acts as an insulating barrier between the burner (or heating element) and the water. The tank has to work harder and longer to reach temperature, which means you’re waiting longer at the tap.
3. Discolored, Rusty, or Gritty Water
If your hot water runs slightly brown, orange, or contains visible particles, sediment or the rust it causes is likely flowing out of the tank with your water.
4. Rising Energy Bills With No Usage Change
A less obvious signal, but a reliable one. If your utility bills have crept up without any change in household routines, your water heater working overtime against sediment is a prime suspect.
5. Reduced Hot Water Capacity
Sediment physically displaces water volume inside the tank. A 50-gallon tank with several inches of sediment at the bottom may effectively deliver only 35–40 gallons of hot water before it runs cold.
How Sediment Buildup Directly Causes Leaks and Water Damage
This is the part most guides skip but it’s why flushing matters beyond just saving a few dollars on your energy bill.
Overheating and Metal Fatigue: Sediment insulates the tank floor from the water above it. The burner continues firing, but the heat can’t transfer efficiently. The metal at the base of the tank repeatedly reaches temperatures far beyond design spec, which causes thermal fatigue microscopic stress fractures that, over time, become visible cracks. Once a tank wall cracks, it leaks. There is no patch.
Accelerated Internal Corrosion: The wet, mineral-rich environment at the bottom of a sediment-coated tank is ideal for corrosion. Rust spreads from the bottom up, compromising the tank liner and eventually the steel shell itself.
T&P Valve Stress: A water heater’s Temperature and Pressure Relief (T&P) valve is the last line of defense against catastrophic failure. Excessive heat from sediment buildup raises internal pressure, forcing the T&P valve to discharge repeatedly. This accelerates wear on the valve and can lead to it failing in the open or worse the closed position.
When a Leak Becomes a Flood: A pinhole crack in a 50-gallon tank, or a failed T&P valve, can release dozens of gallons of water in minutes. If the unit is in a utility room, basement, or on an upper floor, the resulting water damage spreads fast soaking drywall, flooring, insulation, and structural framing.
If you’re already dealing with leak-related water damage in your home, professional remediation matters. The team at FloodFix Solutions – McAllen TX Water Damage Restoration handles emergency extraction, structural drying, and full restoration for exactly these scenarios. Water damage from appliance failures is time-sensitive; the first 24–48 hours determine how much of the structure can be saved.
Step-by-Step: How to Flush Your Water Heater
Safety First: Allow the tank to cool for at least 2 hours before draining. Sediment-heavy tanks can hold water well above scalding temperature at the bottom.
What You’ll Need
- Garden hose (long enough to reach a floor drain or exterior)
- Flathead screwdriver
- Work gloves
- Bucket (optional, for testing drain water clarity)
The Flush Process
Step 1 – Shut Off the Energy Supply: For a gas water heater, turn the thermostat dial to the PILOT setting. For an electric water heater, trip the dedicated breaker in your panel. Never drain a tank while the burner or heating elements are active you risk burning out elements or cracking a hot tank.
Step 2 – Turn Off the Cold Water Inlet: Locate the cold water supply valve on top of the unit and close it. This stops new water from entering while you drain.
Step 3 – Open a Hot Water Faucet Nearby: Crack open the nearest hot water faucet in your home (a sink works perfectly). This breaks the vacuum inside the tank and allows water to flow out freely through the drain valve without air lock.
Step 4 – Connect Your Hose to the Drain Valve: The drain valve is located near the bottom of the tank it looks like a hose bib. Connect your garden hose securely and route the other end to a floor drain, utility sink, or exterior. Sediment-heavy discharge will be discolored and gritty; keep it away from plants or grass.
Step 5 – Open the Drain Valve and Flush: Slowly open the drain valve. Let the tank drain completely. For tanks with heavy sediment, briefly turn on the cold water supply valve while draining this stirs up the sediment layer and flushes it out more thoroughly. Repeat until the draining water runs clear and free of particles.
Step 6 – Close, Refill, and Restart: Close the drain valve, remove the hose, and close the hot water tap you opened earlier. Re-open the cold water inlet and let the tank fill completely you’ll know it’s full when water flows steadily (not sputtering) from the open hot water faucet. Then restore power or return the gas thermostat to your normal temperature setting (typically 120°F).
Step 7 – Inspect the Drain Valve After the tank is back in operation, check the drain valve for drips. Plastic drain valves can leak after being operated for the first time in years. If it drips, replace it replacement valves cost under $10 at any hardware store.
How Often Should You Flush Your Water Heater?
The Plumbing-Heating-Cooling Contractors Association (PHCC) recommends flushing residential water heaters at least once per year as part of routine maintenance. In areas with particularly hard water, twice per year is advisable.
A practical rule of thumb:
- Soft water areas: Flush annually
- Moderate hard water: Flush every 6 months
- Hard water (>180 ppm hardness): Flush every 3–4 months or install a whole-home water softener
The first time you flush a tank that has never been maintained, you may see a significant amount of brownish, gritty discharge. Don’t be alarmed that’s the sediment that’s been insulating your heating element for years. After a few regular flushes, the discharge will run clear within minutes.
When Flushing Isn’t Enough: Signs You Need Professional Service
Flushing is maintenance, not a repair. If your tank shows any of the following, it’s time to call a licensed plumber:
- Persistent leak at the tank body – not at a fitting or valve, but from the tank wall itself. This indicates corrosion damage that flushing cannot reverse.
- Tank age over 10–12 years – most conventional storage water heaters have a service life of 8–12 years. An older tank with active sediment problems is a replacement candidate, not a flush candidate.
- Repeated T&P valve discharges – if your relief valve is regularly venting steam or water, the system pressure and temperature are running outside safe limits.
- Multiple anode rod failures – the anode rod sacrificially corrodes to protect the tank lining. If you’ve replaced it multiple times and the tank is still showing rust, the internal lining is compromised.
For water heater repair, emergency replacement, or a full system inspection, AllState Plumbing Heat and Air – Lake Travis has licensed plumbers available for same-day service on conventional and tankless units across the area.
Pro Tips: Preventing Sediment Between Annual Flushes
Flushing addresses existing sediment – these steps reduce the rate at which it forms:
Install a Whole-Home Water Softener: A softener replaces calcium and magnesium ions with sodium ions, dramatically reducing the mineral load entering your water heater. This is the single highest-impact intervention for households in hard water zones.
Check and Replace the Anode Rod Every 3–5 Years: The anode rod inside your tank prevents corrosion but does not stop sediment. Keeping it fresh, however, preserves the tank liner and buys you more total years before sediment damage becomes structural.
Set Your Temperature to 120°F: The EPA recommends 120°F as the optimal water heater temperature hot enough to prevent bacterial growth, cool enough to reduce the rate at which minerals precipitate and settle. Higher temps accelerate sediment formation significantly.
Install a Sediment Filter on the Cold Water Inlet: For homes with especially hard or particle-laden water, a dedicated sediment filter on the cold water supply line catches particles before they enter the tank at all.
Conclusion
Sediment buildup is one of the most common and most preventable causes of water heater failure. A tank that’s never been flushed is slowly cooking itself from the inside out, raising your energy bills month by month until it finally cracks, corrodes through, or triggers a T&P valve failure that sends water across your floor.
Annual flushing costs nothing but an hour of your time. It extends tank life by years, keeps energy costs in check, and most importantly reduces the risk of a sudden leak turning into a full-scale water damage event.
If your tank is already leaking, showing signs of significant corrosion, or simply hasn’t been maintained in years, don’t wait. Get a professional assessment before the issue escalates from a repair to a restoration.
For water heater repair, replacement, or emergency plumbing service, contact AllState Plumbing Heat and Air– licensed plumbers serving the Lake Travis area and beyond.
Leave a Reply